Imagine your bank charges you less per transaction when you do more transfers. Sounds simple, right? But when you try to implement this in ORMB, it’s not just about applying a rate -you need to understand tiering, rate components, and how values flow step by step.
Let’s break this down using a simple, real-world wire transfer example.
The Business Scenario
A bank charges corporate clients for wire transfers based on monthly usage.
The rule is straightforward:
The more transactions a client performs, the lower the per-transaction fee.
This is a classic volume discount model — very common in banking and billing systems.
The Pricing Logic
Here’s how the pricing is defined:
0–50    → 500 per transaction
51–200  → 350 per transaction
201+    → 200 per transaction
This uses THRESHOLD (THRS) tiering.
That means:
- One single rate applies to the entire transaction count
- The system does NOT split calculation across slabs
So if a client performs 150 transactions:
- The rate is 350
- And all 150 transactions are charged at 350
Not like this:
- First 50 at 500 ❌
- Next 100 at 350 ❌
That would be STEP tiering, which is a completely different logic.
One Simple Example
Let’s take a real case:
- Transactions in a month = 150
- Applicable rate = 350
Now calculation becomes:
- Wire Fee = 150 × 350 = 52,500
- GST (18%) = 9,450
Final Amount : Total = 61,950
That’s it — no complexity at business level.
Now Comes the Real Question
So far, everything looks simple. But here’s where it gets interesting:
- How does ORMB actually calculate this internally?
- How does it know the transaction count?
- How does it pick the correct tier?
- And how does it combine everything into a final bill?
Now that we understand the business logic, let's see how ORMB brings it to life internally. Don't worry if you're new to ORMB — we'll walk through each concept as it appears.
First, Meet the Building Blocks
Before diving into setup, you need to understand the core concepts that drive how ORMB calculates a charge. These aren't random terms — they form a clear hierarchy, and each one has a specific job.
The Hierarchy at a Glance
Rate Schedule
    └── Rate Version (effective date)
            └── Rate Component (actual calculation steps)
Think of it like a folder structure:
- Rate Schedule is the folder
- Rate Version is a dated snapshot inside that folder
- Rate Components are the actual files — the real calculation steps
The Building Blocks Explained
| Concept | Role | Simple Way to Think About It |
|---|---|---|
| Price Item | The service being charged | "What are we billing for?" → Wire Transfer |
| SQI (Service Quantity Identifier) | What ORMB measures | "What did we count?" → Number of transactions |
| Rate Schedule | Container that holds Rate Versions | "Which pricing rulebook applies?" |
| Rate Version | A dated set of Rate Components | "Which version of the rules is active today?" |
| Rate Component | The actual calculation step | "How exactly is the charge calculated?" |
| Tiering Criteria | Holds the SQI and defines the tier ranges — based on the SQI value, the applicable tier is derived | "The SQI value is 150 transactions → look up the tier → land in 51–200 band → apply 300" |
| Price Assignment | Defines pricing for a Price Item and assigns it at Person, Account, or Price List level — ORMB searches through the hierarchy to find the most specific applicable pricing | "Which pricing applies to this customer — and at what level was it defined?" |
Steps
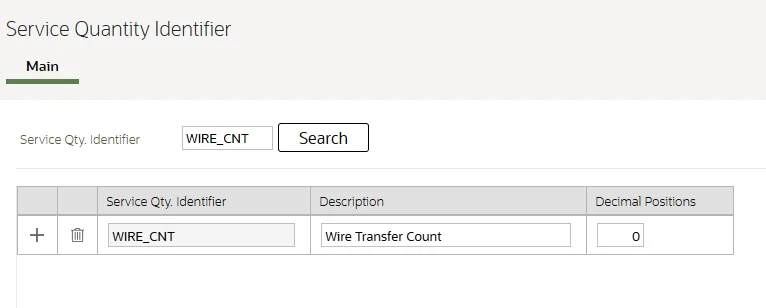
Step 1 — Define the SQI (Service Quantity Identifier)
Before anything else, ORMB needs to know what you are measuring. In our case, that's the number of wire transfer transactions. This is captured through an SQI.
Navigation: Admin Menu → Service Quantity Identifier → Add
| Field | Value |
|---|---|
| SQI Code | WIRE_CNT |
| Description | Wire Transfer count |
| Decimal Positions | 0 (transactions are whole numbers) |
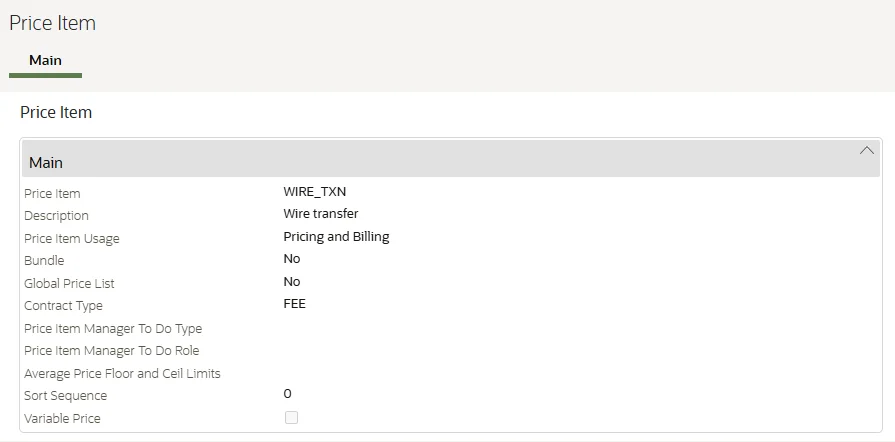
Step 2 — Define the Price Item and attach the SQI
Now that the SQI exists, you can create the Price Item and link the SQI to it.
Navigation: Pricing Management → Price Item → Add
| Field | Value |
|---|---|
| Price Item Code | WIRE_TXN |
| Description | Wire transfer |
| Contract | FEE (select as per your setup) |
| Division | US (select as per your setup) |
| SQI | WIRE_TXN_CNT |
Step 3 — Create the Rate Schedule
The Rate Schedule is the container. Think of it as a folder that holds your pricing rules. By itself, it doesn't calculate anything — it just gives the rules a name and a home.
Navigation: Main Menu → Rates → Rate Schedule → Add
Key fields:
| Field | Value |
|---|---|
| Rate Schedule Code | RS_WIR_V |
| Description | Wire Transfer Volume Pricing rate schedule |
| Service Type | Banking |
| Currency | USD (As per your Setup) |
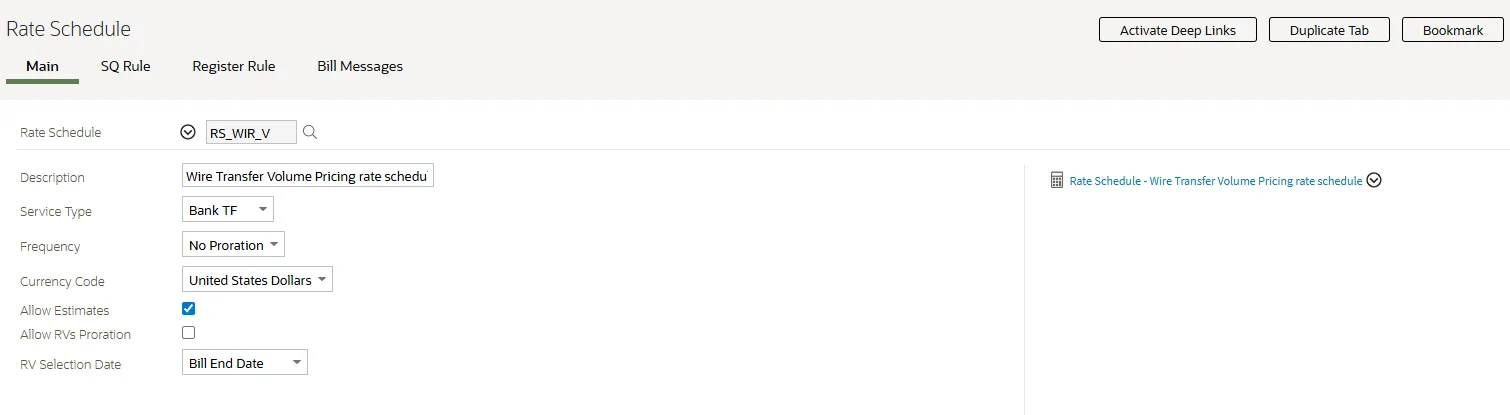
Save this. Now the folder exists — but it's empty. Next we add a Rate Version inside it.
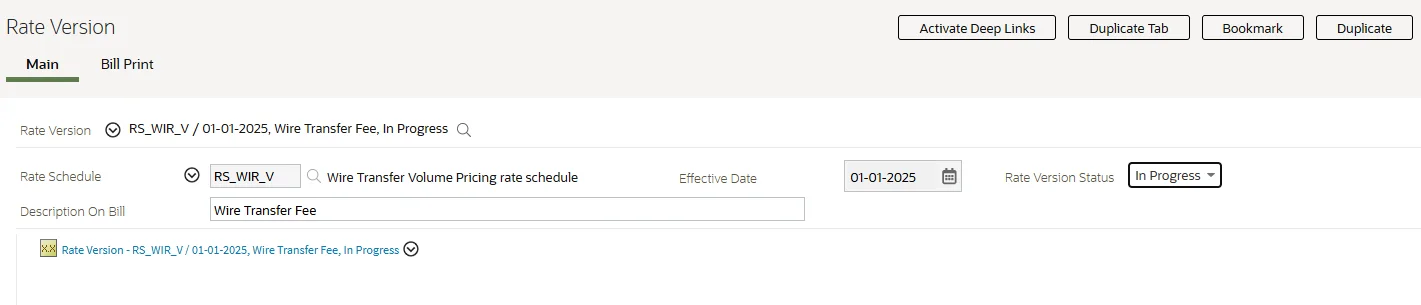
Step 4 — Add a Rate Version
The Rate Schedule defines the rate to which the Rate Version is linked. The Effective Date defines the date on which the Rate Version's Rate Components become effective.
Navigation: Main Menu → Rates → Rate Version → Add
| Field | Value |
|---|---|
| Rate Schedule | RS_WIR_V |
| Effective Date | 1-JAN-2025 |
| Status | In Progress (while building) |
| Description on bill | Wire Transfer fee |
Step 5 — Add Rate Components inside the Rate Version
Rate Components are the actual calculation steps — and they live inside the Rate Version, not as standalone records. A Rate Version's Rate Components have unique sequence numbers. This number controls the order in which a Rate Component is processed.
For our wire transfer example, we need 4 Rate Components:
| Seq | Purpose | FCPO |
|---|---|---|
| 10 | Fetch transaction count from billable charge | Yes |
| 20 | Fetch the applicable tier rate from pricing | Yes |
| 30 | Multiply count × rate → wire fee | No |
| 40 | Apply 18% GST on wire fee | No |
Before we build them, there's one concept worth understanding first.
What is FCPO?
FCPO = For Calculation Purposes Only
When a Rate Component is marked as FCPO, it calculates an intermediate value — but that value is not added to the bill total. It exists purely so that later Rate Components can use its result.
Think of it like a variable in a formula — it holds a value silently in the background.
In our case:
- RC 10 fetches the count → 150 (not a charge — just a number)
- RC 20 fetches the rate → 350 (not a charge — just a rate)
- RC 30 multiplies them → 52,500 (this is the real charge)
- RC 40 applies tax → 9,450 (this is the real tax)
Only RC 30 and RC 40 appear as real amounts on the bill. RC 10 and RC 20 work silently behind the scenes.
Rate Component 10 — Fetch Transaction Count
This is the first step. ORMB reads the WIRE_CNT SQI value directly from the billable charge — giving us the raw transaction count for the month.
Navigation: Rate Version → Rate Components → Add
| Field | Value |
|---|---|
| Sequence | 10 |
| Description | Fetch Wire Transaction Count |
| RC Type | Service Quantity |
| SQI | WIRE_CNT |
| FCPO | Yes |
| FCPO Retention Rule | Retain on Bill Calc Line |

Why "Retain on Bill Calc Line"? Even though this is FCPO — so it won't add to the bill total — turning on Retain on Bill Calc Line means the count (150) stays visible in the bill calculation lines. Useful for auditing and verifying the charge.
Rate Component 20 - Fetch Rate from Pricing
Now that we have the count, ORMB needs to know the rate to apply. This component looks up the applicable tiered rate using the Tiering Criteria configured for WIRE_CNT.
Since we're using THRS (Threshold) tiering, ORMB finds the band that 150 falls into and returns one single rate for the entire volume.
Navigation: Rate Version → Rate Components → Add
| Field | Value |
|---|---|
| Sequence | 20 |
| Description | Fetch Tiered Unit Rate |
| RC Type | Flat Charge |
| Algorithm | Rate Value algorithm (This algorithm will fetch the rate based on the Tier) |
| FCPO | Yes |
| FCPO Retention Rule | Retain on Bill Calc Line |
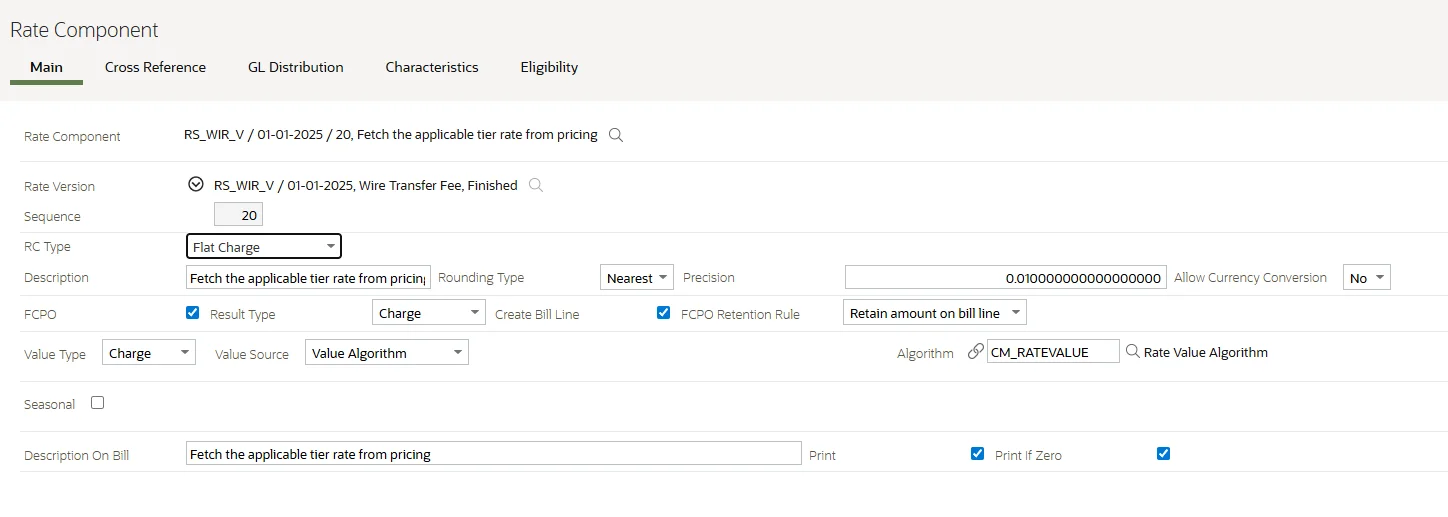
150 transactions → falls in the 51–200 band → applicable rate = 350 With THRS tiering, this rate applies to all 150 transactions — not just the ones above 50.
Rate Component 30 - Calculate Wire Fee
This is where the actual charge is born. RC 30 takes the count from RC 10 and the rate from RC 20, and multiplies them using Oracle's CM-FORMULA algorithm.
Navigation: Rate Version → Rate Components → Add
| Field | Value |
|---|---|
| Sequence | 30 |
| Description | Wire Transfer Fee |
| RC Type | Flat Charge |
| Algorithm | CM-FORMULA |
| FCPO | No |
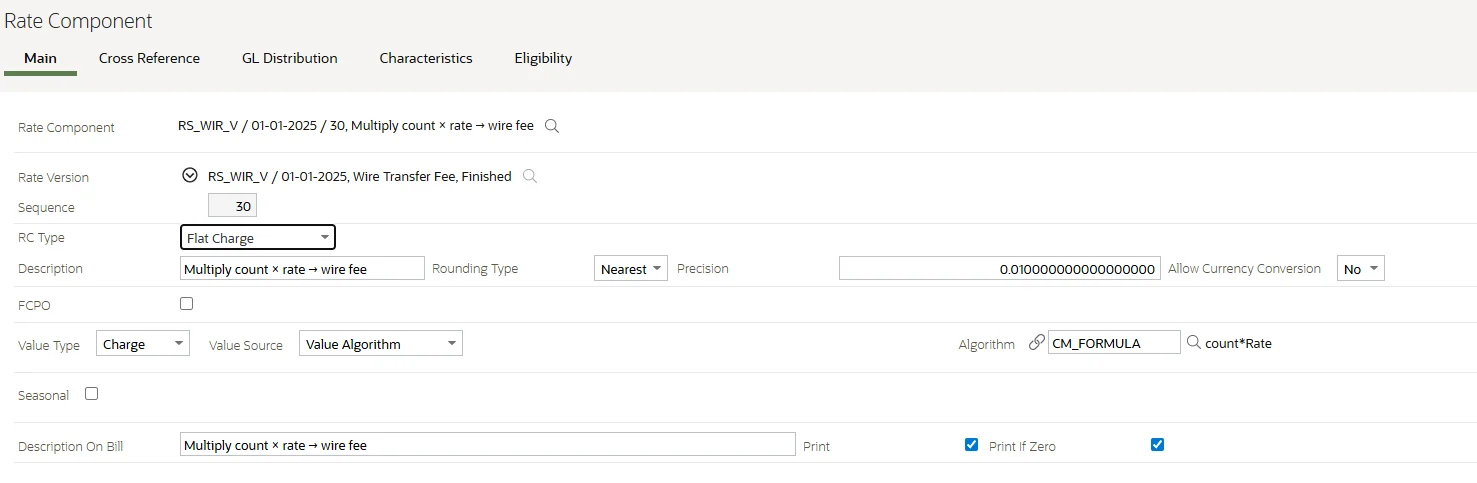
Calculation:
Wire Fee = RC10 × RC20
         = 150 × 350
         = 52,500
This amount appears on the bill as the wire transfer charge.
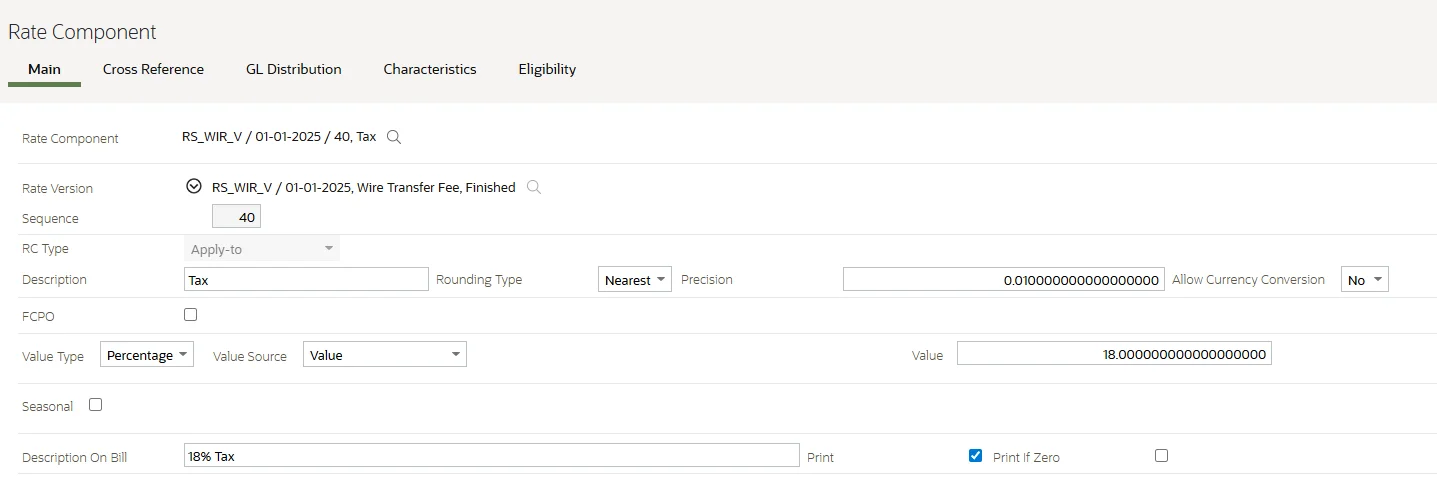
Rate Component 40 - Tax @ 18%
The final component. It takes the wire fee from RC 30 and applies 18% GST on top of it.
Navigation: Rate Version → Rate Components → Add
| Field | Value |
|---|---|
| Sequence | 40 |
| Description | Tax |
| RC Type | Apply To |
| Referenced Sequence | 30 |
| Value Type | Percentage |
| value | 18 |
| FCPO | No |
How It All Flows Together
Here's the full picture — from billable charge to final bill:
Billable Charge (WIRE_CNT = 150)
        │
        ▼
RC 10 → Fetch count → 150          [FCPO]
        │
        ▼
RC 20 → Fetch tier rate → 350     [FCPO]
        │
        ▼
RC 30 → 150 × 350 = 52,500      ← appears on bill
        │
        ▼
RC 40 → 52,500 × 18% = 9,450   ← appears on bill
Final Bill Summary
| RC | Description | Amount |
|---|---|---|
| 10 | Wire Transaction Count (FCPO) | 150 txns |
| 20 | Applicable Tier Rate (FCPO) | 350 |
| 30 | Wire Transfer Fee | 52,500 |
| 40 | Tax 18% | 9,450 |
| Total Amount Due | 61,950 |
RC 10 and RC 20 don't contribute to the total — they're the silent building blocks. RC 30 and RC 40 are the real bill lines the customer sees.
Step 6 — Configure Rate Definition
Before ORMB can use your Rate Schedule for tiered pricing, it needs to know how the tiering works. That's what the Rate Definition is for.
The Rate Definition is linked to the Rate Schedule and tells ORMB the type of rate being applied — Flat, Tiered, or Threshold.
Navigation: Main Menu → Rates → Rate Definition → Add
| Field | Value |
|---|---|
| Rate Schedule | RS_WIR_V |
| Rate Type | Threshold (THRS) |
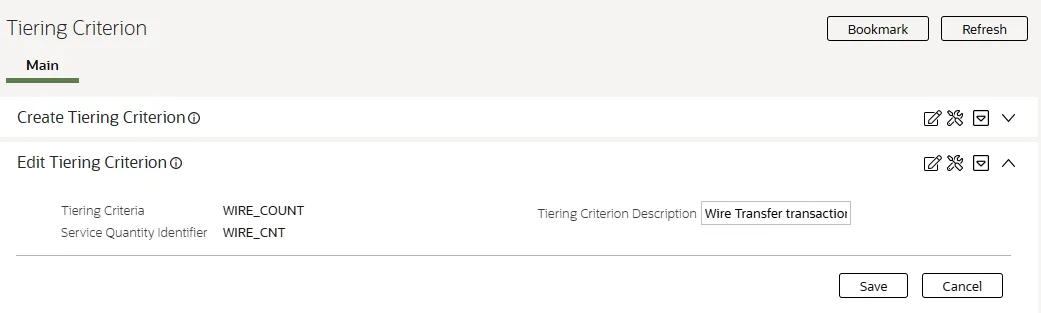
Step 7 — Configure Tiering Criteria
The Tiering Criteria defines what to measure when deciding which tier applies. It holds the SQI and acts as the reference point for the tier lookup in RC 20.
Navigation: Admin Menu → Tiering Criteria → Add
| Field | Value |
|---|---|
| Tiering Criteria Code | WIRE_COUNT |
| Description | Wire Transfer transaction count |
| SQI | WIRE_CNT |
Step 8 — Configure Pricing at Account Level
Now we assign the actual pricing to the customer. This is where the tier ranges and their rates are defined, and it's linked directly to the account.
Navigation: Pricing Management → Pricing → Add
| Field | Value |
|---|---|
| Pricing Level | Account |
| Agreement Type | Currently Agreed |
| Price Item | WIRE_TXN |
| Rate Schedule | RS_WIR_V |
| Tiering Criteria | WIRE_COUNT |
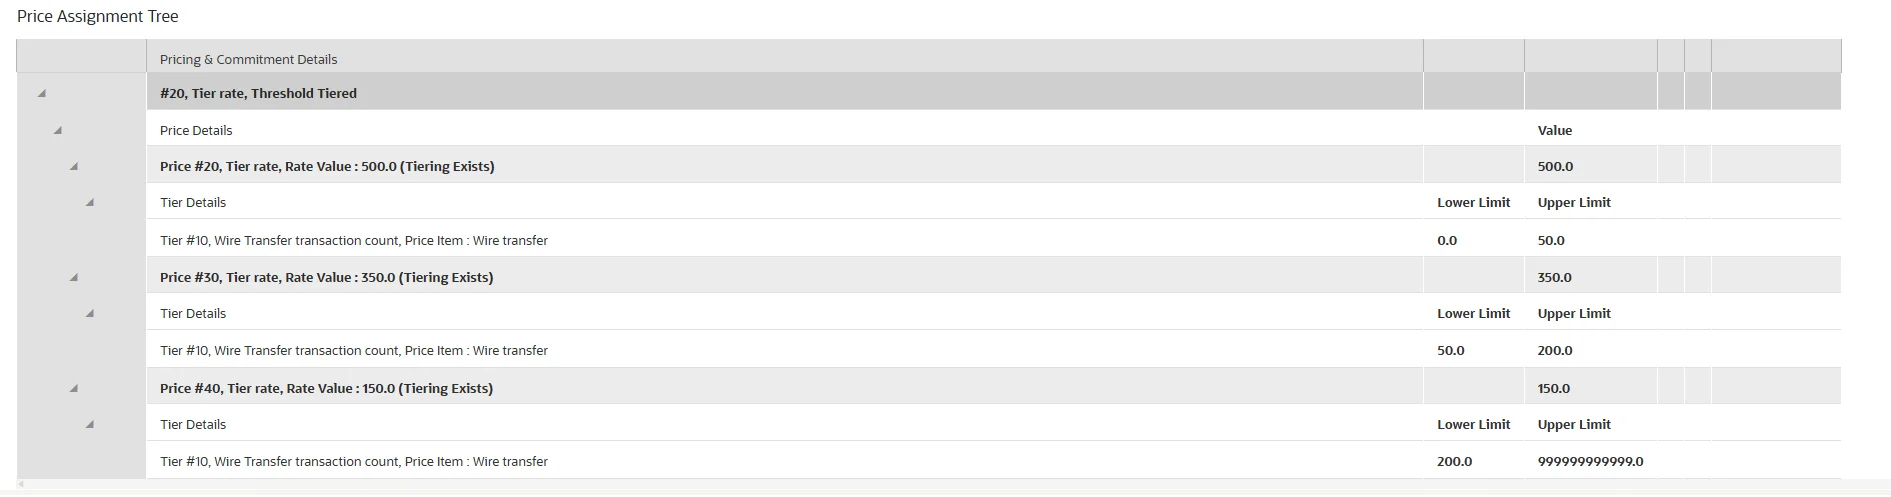
Tier Rates defined inside Pricing:
| Tier | From | To | Rate |
|---|---|---|---|
| 1 | 0 | 50 | 500 |
| 2 | 51 | 200 | 350 |
| 3 | 201 | 99999 | 200 |
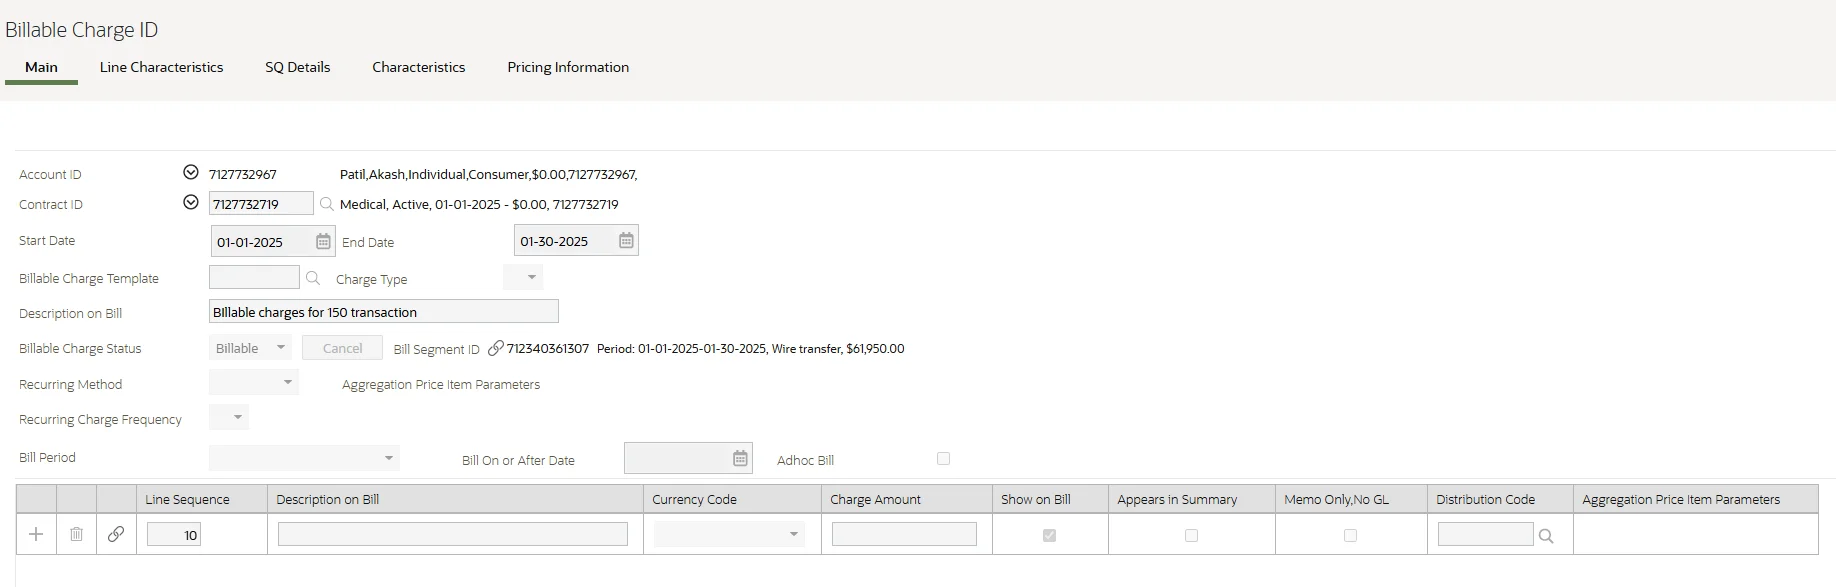
Step 9 — Create the Billable Charge
The Billable Charge is what triggers the rating. It represents the actual usage for the month — in our case, 150 wire transfer transactions.
Navigation: Main Menu → Billing → Billable Charge → Add
| Field | Value |
|---|---|
| Account | (Your test account) |
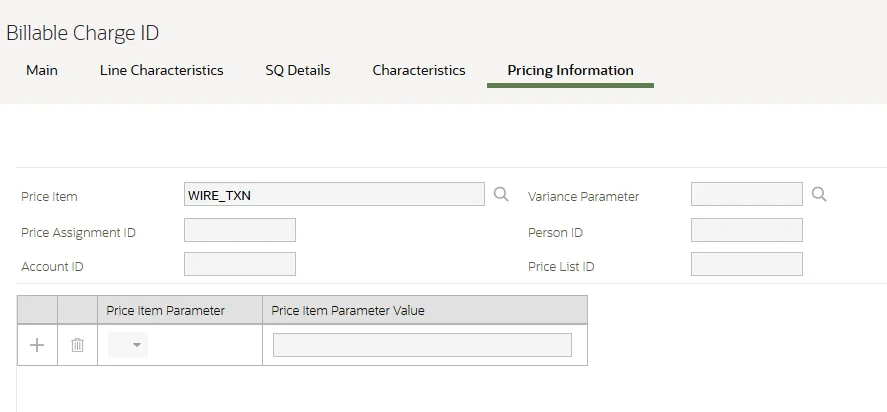
| Price Item | WIRE_TXN |
| Start Date | 1-JAN-2025 |
| End Date | 31-JAN-2025 |
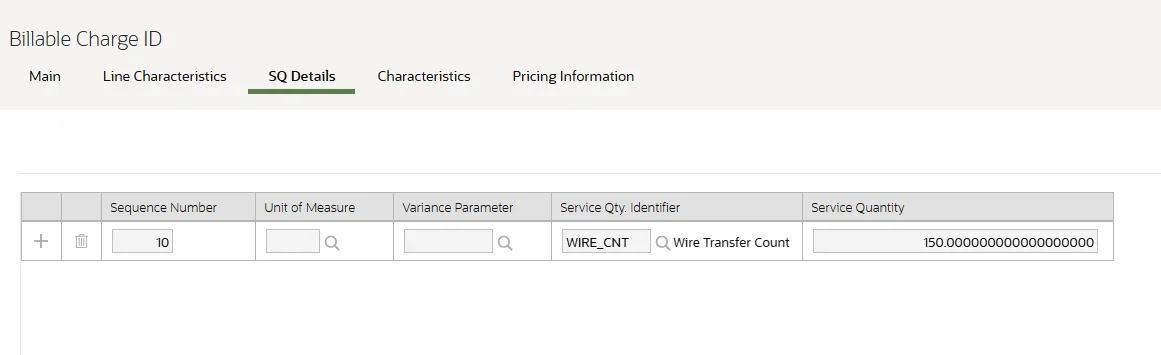
| SQI | WIRE_CNT |
| SQI Value | 150 |
Think of the Billable Charge as the input to the rating engine. It says — "this account consumed 150 wire transfer transactions in January." ORMB takes this, runs it through the Rate Schedule, and produces the bill.
Once saved, the billable charge sits waiting — ready to be picked up when a bill is generated for this account.
Step 10 — Generate the Bill
With everything in place — Rate Version, Rate Components, Pricing, and Billable Charge — it's time to generate the bill and see ORMB do its job.
Navigation: Main Menu → Billing → Bill → Add
Select the account and trigger billing. ORMB will:
- Find the billable charge for this account
- Pick up the Rate Schedule from the pricing
- Run the 4 Rate Components in sequence
- Produce the bill segment with calc lines
What the Bill Calculation Lines look like:
| Seq | Description | Value |
|---|---|---|
| RC 10 | Wire Transaction Count (FCPO) | 150 TXNS |
| RC 20 | Applicable Tier Rate (FCPO) | 350 |
| RC 30 | Wire Transfer Fee | 52,500 |
| RC 40 | GST @ 18% | 9,450 |
| Total Bill Amount | 61,950 |
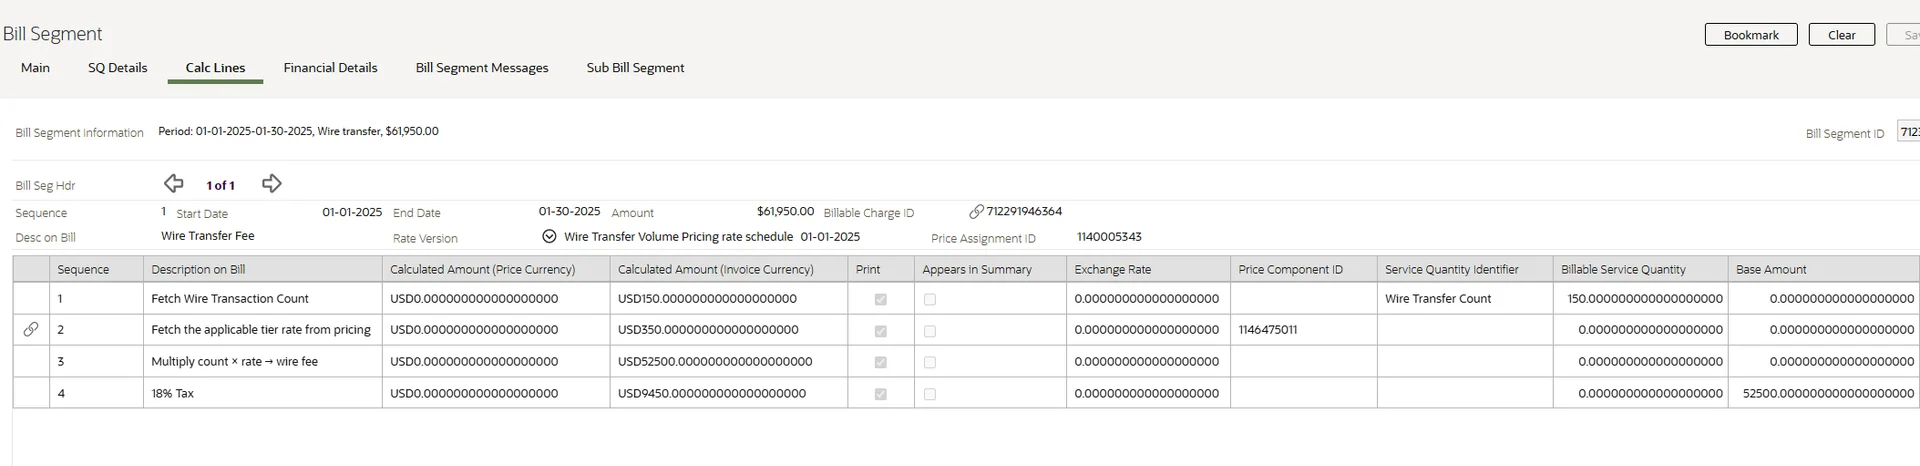
Tiered pricing in ORMB isn't magic — it's just the right setup in the right order. Once the pieces click, the system does exactly what you'd expect. And the bill speaks for itself — 61,950, calculated to the penny.RC 10 is visible in the calc lines because we set Retain on Bill Calc Line when configuring it. RC 20 is FCPO and worked silently — but RC 10 gives you full transparency on the count that drove the calculation.